In this article, we explain what to do if your computer is stuck on a completely black screen when your computer restarts after you click Reboot and Start FixMeStick. If your computer is stuck on a black screen, it means that you weren’t able to launch a FixMeStick scan successfully - so read on to learn how you can troubleshoot this issue.
Index:
Starting a FixMeStick Scan from the Boot Menu
Starting a Scan Using the Failsafe Options
Factory Upgrading Your FixMeStick Device
If you are not sure what version of Windows you are using, click here to learn how you can find out.
Starting a FixMeStick Scan From the Boot Menu
Step 1: Hold down the power button on your computer until it powers down and remove the FixMeStick device.
Step 2: Press the power button on your computer to turn the computer back on. If you have a login password, enter it. Allow the computer to load to your home screen.
Step 3: Insert the FixMeStick device into a USB port on your computer. If you get a message to format your FixMeStick, please click here.
Step 4: Click the Windows start logo at the bottom left hand corner of your screen to open the Windows start menu.
Index for Windows Version:
- Windows XP you're looking for "My Computer," located on the right hand side of the start menu. Click on it.
- Windows Vista and Windows 7 you're looking for"Computer,"located on the right hand side of the start menu. Click on it.
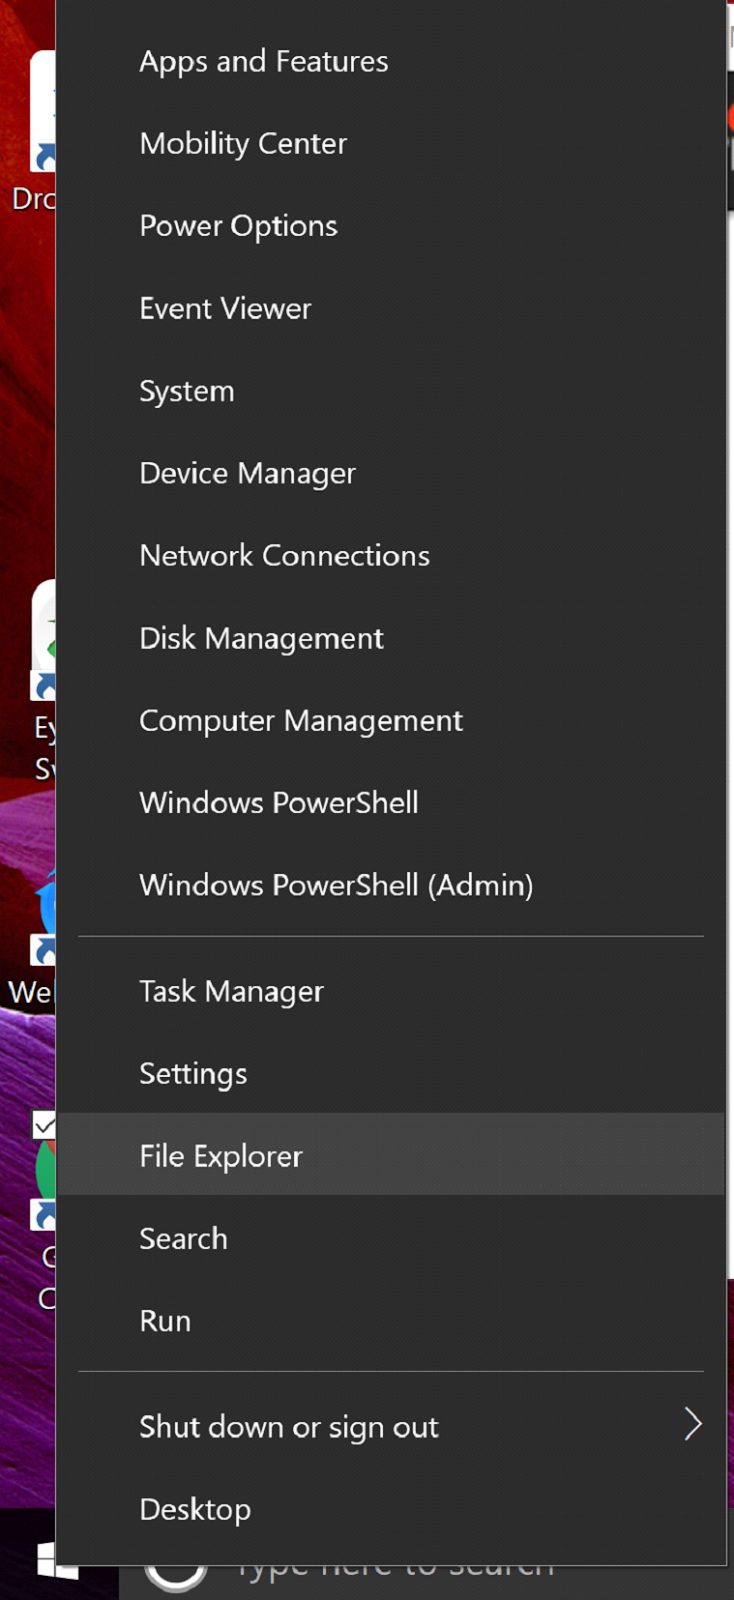
- Windows 8/8.1and Windows 10/11 you're looking for "File Explorer," you can type "File Explorer" into the search bar in the start menu or it will appear on your screen.You will have to left-click on it.
Step 5: Double-click the FixMeStick USB option located on the left hand panel, or underneath Devices with Removable Storage or Devices and Drives. If you can't find the FixMeStick USB, click here.
Step 6: When you are in the FixMeStick USB folder, you should see a list of different languages:
- Locate and double-click on FixMeStick. If you can't find the FixMeStick application, click here.
- Depending on the update version of your FixMeStick device, the FixMeStick USB folder may look slightly different than what is explained above. The FixMeStick application can show up as FixMeStick or RunFixMeStick as well.
Step 7: A pop-up will ask if you will allow the FixMeStick to make changes to your computer. Click on Yes.
Step 8: You will eventually see the end user license agreement similar to the example below. Click on Accept.
Step 9: The application will then search for updates for your FixMeStick device. Allow the updates to complete. If you get a page asking you to plug in your FixMeStick and it is already plugged in, please click here.
- After the updates are complete, wait until the What Happens Next window appears:
Step 10: Before selecting Reboot and Start FixMeStick, find the appropriate Boot Menu key based on the make of your computer here.
- Once you’ve identified your Boot key, click on Reboot and Start FixMeStick
- Your computer will restart.
- Immediately start tapping your Boot key on your keyboard (1-2 times per second) while your computer is restarting.
- Keep tapping the Boot key until you see the Boot Menu or the Boot Device Options on the screen.
- Each computer brand has a boot menu that looks slightly different from the others. Here are some examples:
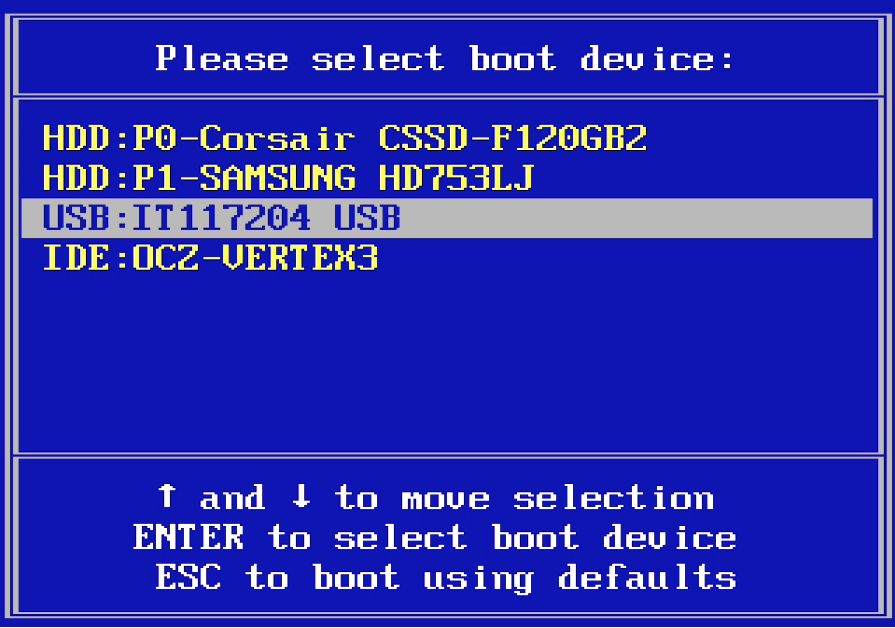
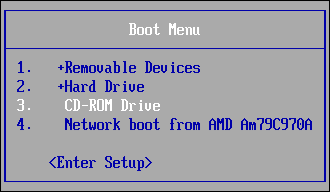
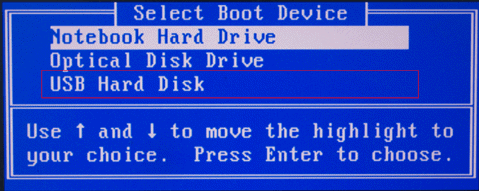
- Using the up and down arrow keys on your keyboard, highlight the option that says FixMeStick in the Boot Menu.
- If you are not seeing any option that mentions FixMeStick, try an option that says USB Device or USB Storage.
- When the FixMeStick or the USB option is selected, press the Enter key on your keyboard.
Step 11: Our logo will appear. The computer screen may go black for a moment, and the words FixMeStick… may appear in the top left corner. Eventually, our logo screen will appear again.
- Keep in mind that it might take a couple of minutes for your computer to start the scan.
- When you see Computer Status: Safe so far on the screen, it means that you’re in the FixMeStick scan!
- If you’re still not able to get into a scan, continue with the next steps.
Starting a Scan Using the Failsafe Options
Step 1: Hold down the power button on your computer until it powers down and remove the FixMeStick device.
Step 2: Press the power button on your computer to turn the computer back on. If you have a login password, enter it. Allow the computer to load to your home screen.
Step 3: Insert the FixMeStick device into a USB port on your computer. If you get a message to format your FixMeStick, please click here.
Step 4: Click the Windows start logo at the bottom left hand corner of your screen to open the Windows start menu.
Index for Windows Version:
- Windows XP you're looking for "My Computer," located on the right hand side of the start menu. Click on it.
- Windows Vista and Windows 7 you're looking for"Computer,"located on the right hand side of the start menu. Click on it.
- Windows 8/8.1and Windows 10/11 you're looking for "File Explorer," you can type "File Explorer" into the search bar in the start menu or it will appear on your screen.You will have to left-click on it.
Step 5: Double-click the FixMeStick USB option located on the left hand panel, or underneath Devices with Removable Storage or Devices and Drives. If you can't find the FixMeStick USB, click here.
Step 6: When you are in the FixMeStick USB folder, you should see a list of different languages:
- Locate and double-click on FixMeStick. If you can't find the FixMeStick application, click here.
- Depending on the update version of your FixMeStick device, the FixMeStick USB folder may look slightly different than what is explained above. The FixMeStick application can show up as FixMeStick or RunFixMeStick as well.
Step 7: A pop-up will ask if you will allow the FixMeStick to make changes to your computer. Click on Yes.
Step 8: You will eventually see the end user license agreement similar to the example below. Click on Accept.
Step 9: The application will then search for updates for your FixMeStick device. Allow the updates to complete. If you get a page asking you to plug in your FixMeStick and it is already plugged in, please click here.
- After the updates are complete, wait until the What Happens Next window appears:
Step 10: On the What Happens Next window, click Reboot and Start FixMeStick.
- Your computer will restart.
- Immediately start tapping the space bar on your keyboard once every second or faster while your computer is in the process of rebooting.
- Keep tapping the space bar until you see the FixMeStick Failsafe 1 and FixMeStick Failsafe 2 options on the upper left hand corner of a black screen:
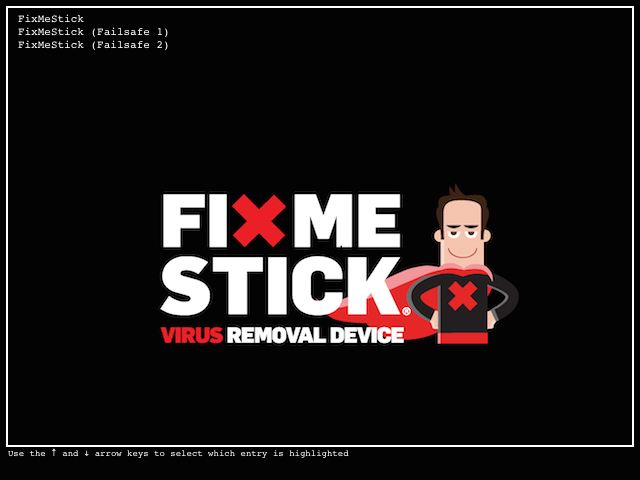
- Using the up and down arrow keys on your keyboard, highlight FixMeStick Failsafe 1 and press the Enter or Return key on your keyboard.
Step 11: You should then see the FixMeStick logo screen appear. This means the scan is being launched.
- Keep in mind that it might take a couple of minutes for your computer to start the scan.
- When you see Computer Status: Safe so far on the screen, it means that you’re in the FixMeStick scan!
- If FixMeStick Failsafe 1 didn't work, repeat these steps and this time select FixMeStick Failsafe 2.
- If you’re still not able to get into a scan, continue with the next steps.
Factory Upgrading Your FixMeStick Device
Step 1: Hold down the power button on your computer until it powers down and remove the FixMeStick device.
Step 2: Press the power button on your computer to turn the computer back on. If you have a login password, enter it. Allow the computer to load to your home screen.
Step 3: Insert the FixMeStick device into a USB port on your computer. If you get a message to format your FixMeStick, please click here.
Step 4: Click the Windows start logo at the bottom left hand corner of your screen to open the Windows start menu.
Index for Windows Version:
- Windows XP you're looking for "My Computer," located on the right hand side of the start menu. Click on it.
- Windows Vista and Windows 7 you're looking for"Computer,"located on the right hand side of the start menu. Click on it.
- Windows 8/8.1and Windows 10/11 you're looking for "File Explorer," you can type "File Explorer" into the search bar in the start menu or it will appear on your screen.You will have to left-click on it.
Step 5: Double-click the FixMeStick USB option located on the left hand panel, or underneath Devices with Removable Storage or Devices and Drives. If you can't find the FixMeStick USB, click here.
Step 6: When you are in the FixMeStick USB folder, you should see a list of different languages:
- Locate and double-click on FixMeStick. If you can't find the FixMeStick application, click here.
- Depending on the update version of your FixMeStick device, the FixMeStick USB folder may look slightly different than what is explained above. The FixMeStick application can show up as FixMeStick or RunFixMeStick as well.
Step 7: A pop-up will ask if you will allow the FixMeStick to make changes to your computer. Click on Yes.
Step 8: You will eventually see the end user license agreement similar to the example below. Click on Accept.
Step 9: The application will then search for updates for your FixMeStick device. Allow the updates to complete. If you get a page asking you to plug in your FixMeStick and it is already plugged in, please click here.
- After the updates are complete, wait until the What Happens Next window appears:
Step 10: On the What Happens Next window, click Settings that’s located at the top towards the right hand side within this window.
- You will see only one option on this page. Click the grey button that says Factory Upgrade.
- Factory Upgrading your FixMeStick device can take anywhere from a couple of minutes to an hour depending on your internet connection speed. If the update page disappears immediately, it likely did not go through. In that case, click here.
- Once the Factory Upgrade is complete, the current window will disappear and the What Happens Next window will automatically pop up again.
Step 11: On the What Happens Next window, click on the red button that says Reboot and Start FixMeStick.
- After your computer logs out of Windows and reboots, you should then see the FixMeStick logo screen appear. This means the scan is being launched.
- Keep in mind that it might take a couple of minutes for your computer to start the scan.
- When you see Computer Status: Safe so far on the screen, it means that you’re in the FixMeStick scan!