In this article, we explain how to start using your FixMeStick, depending on what version of Windows you are using.
If you have a Windows 10/11 computer, here's a video on how to get started:
If you aren't sure of what version of Windows you're running on your computer, click here.
Don't have a PC? Click here for the Mac getting started instructions.
Here are more detailed instructions on how to get started:
Step 1: Plug in your FixMeStick device. If you get a message to format your FixMeStick, click here.
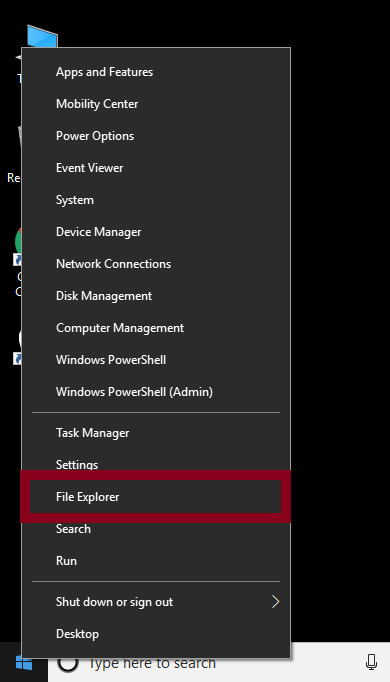
Step 2: Click on the Windows icon (or Start) in the bottom left-hand corner of the screen. This will bring up your computer's start menu.
The next step will depend on which version of Windows you have installed on your computer:
- Windows XP you're looking for "My Computer," located on the right hand side of the start menu.
- Windows Vista and Windows 7 you're looking for "Computer," located on the right hand side of the start menu.
- Windows 8/8.1 and Windows 10/11 you're looking for "File Explorer."You can also search for File Explorer in the search bar.
Step 3: Click the FixMeStick USB option located on the left-hand side of the window. If you can't find the FixMeStick USB option, click here.
Step 4: You will be brought to a list of Getting Started Guides, with an option that says FixMeStick at the bottom. You will need to double left-click the FixMeStick application to open it. If you can't find the FixMeStick application, click here.
- A pop-up will ask if you want to allow the FixMeStick application to make changes to your computer. Click Yes.
Step 5: At any point after that, another pop-up may appear asking you to accept the end user license agreement. Click Accept.
- Your FixMeStick will search for updates, as shown in the picture below. Allow the updates to complete. If you get a message asking you to plug in your FixMeStick and it's already plugged in, click here.
Step 6: After the updates are complete, wait until the What Happens Next window appears. Click the Reboot and Start button to start your FixMeStick scan.
- Your computer will restart, and our logo will appear. Your computer screen may go black for a moment, and the words FixMeStick… may appear in the top left corner. Eventually, our logo screen will appear again.
- If your computer screen stays black after clicking Reboot and Start, click here.
- If your computer screen stays black with white text on it after clicking Reboot and Start, click here.
- If your computer screen stays black with a blinking white cursor in the corner after clicking Reboot and Start, click here.
- If your computer reboots back to Windows, click here.
- If your computers stays frozen on our logo screen after clicking Reboot and Start, click here.
- Our in-scan screen will appear, as shown below. During step one of the scan, your FixMeStick will search for an internet connection, and should connect automatically. If it doesn't connect automatically, click here.
- During step two of the scan, your FixMeStick will check for product updates. At this point, your scan might repeat steps one and two if an update was needed. If you get a message saying that you are not authorized to run a scan, click here.
- At step three, your FixMeStick will update malware definitions. You'll be prompted to register your FixMeStick if you haven't done so already. We highly recommend you register your stick.
- You may receive a message that says "Please press a key or move your mouse." If you receive this message you can either press any key on your keyboard, or move your mouse to continue.
- Once your scan hits step five, you'll see a message that says "You can go take a break." Your input won't be needed again until your scan is complete. A scan typically takes between two and six hours to complete, but may be longer depending on the number of files that need to be scanned.
Step 7: Once the scan is complete, a window will appear with the number of threats found during your scan. You can either choose to Remove Viruses or View Details to see what was found. If no threats were found, you can choose to exit FixMeStick. If your scan did not complete, click here.
Step 8: When the FixMeStick has finished cleaning any threats found, you'll have the option to exit FixMeStick. Wait until your computer fully shuts down before removing your FixMeStick device. If experience any issues after running a scan, please visit our Knowledge Base page for post-scan issues by clicking here.